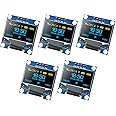
✨ Elevate your DIY projects with OLED clarity that commands attention! 🔥
This 5-pack of 0.96 inch OLED display modules features a sharp 128x64 pixel resolution driven by the SSD1306 IC, offering ultra-high contrast and wide viewing angles. Compatible with Arduino, Raspberry Pi, and other microcontrollers, these self-luminous screens operate at a low voltage (3.3V-5V) and ultra-low power consumption (0.04W), making them perfect for professional-grade embedded projects requiring crisp visuals and energy efficiency.


| RAM | LPDDR4 |
| Wireless Type | Bluetooth |
| Brand | Hosyond |
| Operating System | Linux |
| Item Weight | 1.44 ounces |
| Product Dimensions | 1.09 x 1.07 x 0.11 inches |
| Item Dimensions LxWxH | 1.09 x 1.07 x 0.11 inches |
| Color | Blue and Yellow |
| Number of Processors | 1 |
| Manufacturer | Hosyond |
| ASIN | B09C5K91H7 |
| Date First Available | August 9, 2021 |
J**N
All 5 are in use, no issues at all.
Started adding one of these to my projects because I like to see what is happening, simple to integrate and program, so displaying information on the screen is rather easy. I need to order some more because I have all 5 in use and so far no issues with any of them.
A**K
Works great to repair an OpenSprinkler controller that has a burned-out display
I use an OpenSprinkler controller to run my yard irrigation system. The controller has an OLED display on the front that shows the status of the system, but over time it gets burned in, making it extremely difficult to read what’s on the screen. These OLED displays that I bought are a drop-in replacement for the one that came with the OpenSprinkler controller, so they are a very cost effective and simple way to restore the OpenSprinkler controller to like-new condition. I opted to go with the blue displays instead of the white ones that would have matched what came with the OpenSprinkler controller, but I’m sure the white ones would work just as well. I’m very happy with the quality of the display… it’s very sharp and easy to read.
R**D
Perfect small display, easy to integrate
I've used these displays on several other projects, so I selected them again. The price is good, but not great. They work exactly as advertised. Note that some of the displays are monochrome (bluish green), but others have a few lines at the top that emit yellowish light. I like the ones that have a few yellow lines as you can highlight a title of whatever it is you're displaying.The only complaint I have is that Amazon does not include detailed dimensions of the part. I had to search other 0.96" parts (also from Amazon) to get the dimensions I needed. I integrate the display into a 3D printed housing. To get the front of the display flush with the housing, I needed to provide relief around the panel for a good fit. So I need all the physical dimensions.
S**T
Easy to use
Easy to read, easy to integrate. Easy to program, lots of open source libraries.Have fun!
W**Y
These work very well very easy to work with.
These worked very well, although they are very fragile so don’t drop them.
B**G
Easy to get working on RPi Pico
These are neat little displays for a good price. Was pretty easy to get going on a Raspberry Pi Pico (RP2040). Display is clear and big enough to see text even when the characters are ~2mm high. Build quality seems good enough for a bare PCB; has a 4-pin I2C header and 2mm mounting holes.By default, the device address is 0x3c, but if you are good with a soldering iron, you can move a tiny SMD resistor to change the address to 0x3D; the spot is clearly written on the back of the PCB near the header pins.There was no documentation with the displays, so you are kinda on your own. But, using Circuit Python, and ADAFruit's bootloader and libraries, and then Googling around, I was able to get it working easily enough. I did have to add a couple 4.7kΩ pull-up resistors on the SDA and SCL lines (the little circuit board attached to the display in my pic).Following another reviewer's advice, I powered it by 3.3v from the RPi output. If you need a starting point (like I did), I've attached a picture showing it working and a screenshot of the basic code I used to get it running. There's probably better ways, but this is just what I did. Hopefully, those pics are allowed. If not, you might have to Google around. Just remember to set the GPIO pins for your I2C, device address 0x3c, and the display dimensions (128x64) where needed.
A**E
Fun to use
Used one so far, works well. Fun
R**R
These are cool!
To anyone attempting to run these on 5v, it DOES work, but there's a program variable you must set to change the voltage to avoid burning it out. It's simpler to just connect VCC to the 3.3v pin on the Ardruino board unless your project requires it.There are powerful graphics libraries written for this that are available for free from Adafruit. I recently got the Elegoo Uno R3 set and had been working through the demos, when I had the opportunity to add this to another Amazon purchase. All five worked right out of the box. I did have to change the address in the code because these are preconfigured to be 0x3C not 0x3D as the library assumes. I was curious what it would take to run one of these vertically, and it turns out you can rotate between four orientations with a single function call.I purchased the solid white displays, which do not have the black line across them that others have mentioned the two color displays have.
Trustpilot
2 months ago
2 weeks ago